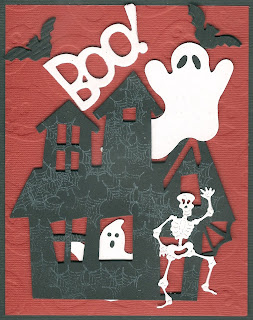
 Haunted House Card
Tools used;
Sizzix Die cut system, Dies and texture plates
White Ink
Pop dots
Craft tape or glue
Supplies;
These can be foamies, stickers or die cuts
1 Haunted House
2 small Ghosts
1 small skeleton
4 bats
2 boo or something stamped
cobweb stamp
6”x5” Orange Paper
Small piece black paper
Run Orange paper thru texture plate. Using white ink and a cobweb stamp, stamp the haunted house with white cobwebs randomly. Attach small pieces of black paper behind ghost’s eyes. Attach one of the ghosts to back of house showing thru the window. Put pop dots on back of house and mount to bottom of orange card. Add bats, second ghost and Boo. Put skeleton at front door.
Skull Card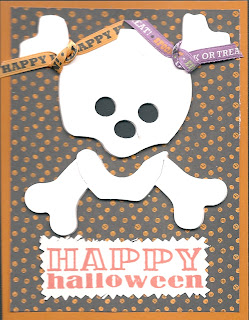
Tools Used;
Sizzix Die cut system White Ink
Pop dots Craft tape or glue
Edging scissors
Supplies;
2 Skull Die
2 4” ribbons
1 4 ¼” x 5 ½“ plain paper
1 4” x 5” printed paper
1 small piece of black paper
1 paper-Stamp or sticker
Pop dots craft tape or glue
Edging scissors
Lay printed paper on top of plain paper leaving an even amount showing around edges. Mount pop dots to back of Skull, glue black paper to back of other skull, mount first skull on top of skull with black paper on the bottom. Tie ribbon to top bones of skull and then mount onto printed paper toward the top of card. Create title with stamp, sticker, rub on or die. Then cut edge with edging scissors. Add to card at bottom.
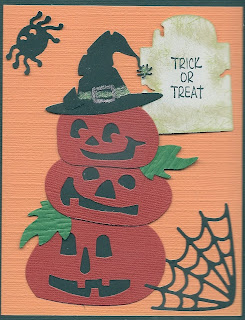
Trick or Treat Pumpkins
Tools used;
Sizzix Die cut system, Dies and texture plates
White Ink
Pop dots
Craft tape or glue
Supplies;
1 4 ¼” x 5 ½“ plain paper textured
3 Jack-o-lanterns different sizes
1 small cobweb
1 tombstone shape
1 small spider
1 witches hat
Black paper
Put pieces of black paper behind eyes, nose and mouth of Jack-O-Lanterns. Stack Jack-O-Lanterns on top of each other place cobweb in corner or on page somewhere. Add color to the hat band and then place on top Jack-O-Lantern. Stamp or sticker tombstone with greeting and add spider to card.


 Haunted House Card


 Doesn't this card just make you happy looking at it? I started with a prefolded Orange card too a scrap of colorful paper left over from a scrapbook page. took a scrap of yellow paper that i cut about 1½ inch larger the colorful scrap. took my Fiskars loopy border punch and punched a border on both sides of the yellow paper. I glued the colorful paper on top of the yellow then I picked 5 coordinating buttons and attached them with different color craft thread. I stamped happy birthday on a tag and attached. I used a stamp to create the cup cake and after i colored it in I applied Marvy puffy paint as the frosting and heated to make it look like real frosting. I used a
  popup to mount the cupcake on a square of paper in a contrasting color and then used another square of a different color as a mat. For the inside i used a simple Sizzlit Happy Birthday cut and a Sizzlit balloon die. I cut the Ballons out of scraps of matching paper and then glued to a piece of chipboard i cut from the same die. I applied some "InKissentials" Glossy accents to the balloons and let it dry. 15 minutes start to finish and I used scraps and some of those hundreds of buttons (the ones i kept buying because I thought they were cute but never used) to make this great birthday card.
 The second card is so easy and simple but it still has apeal because of the stitching. I stitched (baclstitched) the word baby on 4 small Squares (i used the smallest square from Creative memories square punch duo. Then i attached them to 4 larger squares (The larges square from my large Creative Memories square punch) after i attached to the paper i did a zig zag stitch all the way around and accross the center.